Category Archives: Uncategorized

The Bayeux Tapestry: Scene 65

The Bayeux Tapestry is “certainly one of the most important works of pictorial narrative art” (Noxon, 1968, p. 29). At around 230 feet long, the embroidered “tapestry” depicts the story of Harold Godwinson, William of Normandy, and William’s eventual succession of Edward the Confessor’s throne. According to the tapestry, Harold, an English noble, broke an oath of fealty he had made to William while in France, and claimed the throne for himself, resulting in William’s invasion of England and the bloody Battle of Hastings in 1066. The Bayeux Tapestry gives the complete series of events, being one of “the fullest pictorial record[s] of a medieval battle in existence” (Bartlett, 2010). Despite its cartoony representation, the expressive images of the tapestry can tell us not only about the happenings associated with Harold and William, but also about warfare during the Medieval period.

The tapestry is a “complex dramatized narrative, part truth and part fiction” (Noxon, 1968, p. 29). The Normans won the battle and William became king, making it likely that the tapestry was made as a commemorative piece. Because they did win, there could very well have been some embellishments to the story. It is obvious that the tapestry was a “sponsored, propaganda work, designed for an illiterate mass audience,” that was probably commissioned by William’s half-brother Odo, the Bishop of Bayeux (Noxon, 1968, p. 30). It would have been important for the makers to represent Harold as a “brave warrior” with the “fatal flaw[s]” of “overweening pride and vanity,” rather than as a power-hungry villain, because he still had many supporters in England (Noxon, 1968, p. 30).

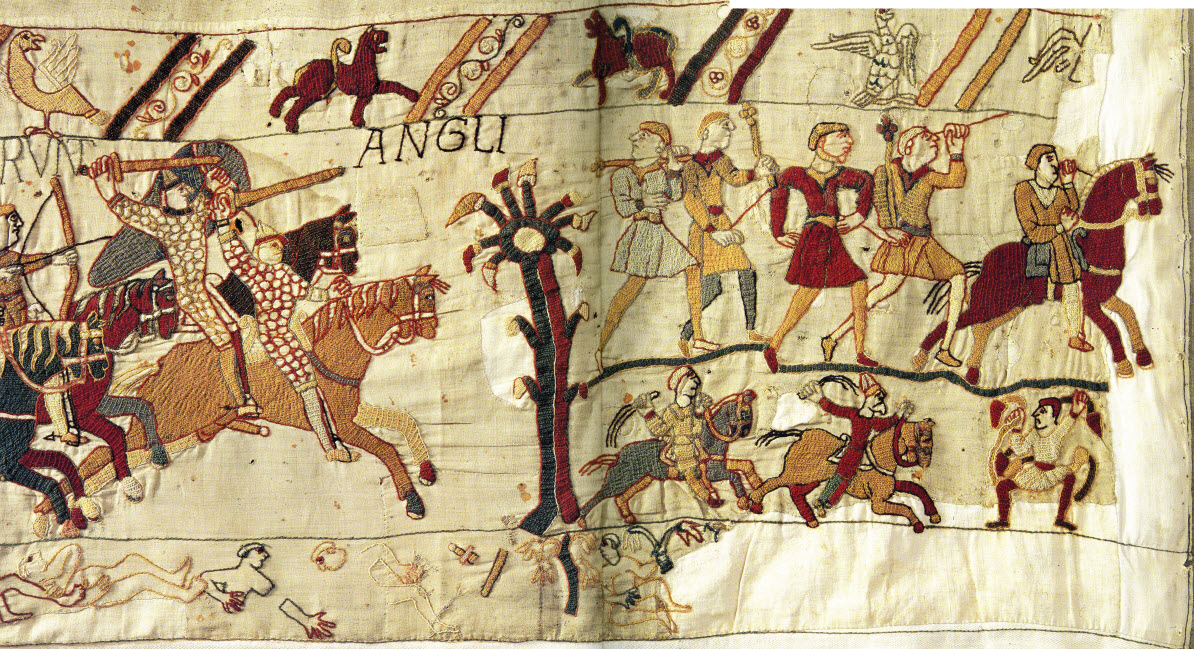
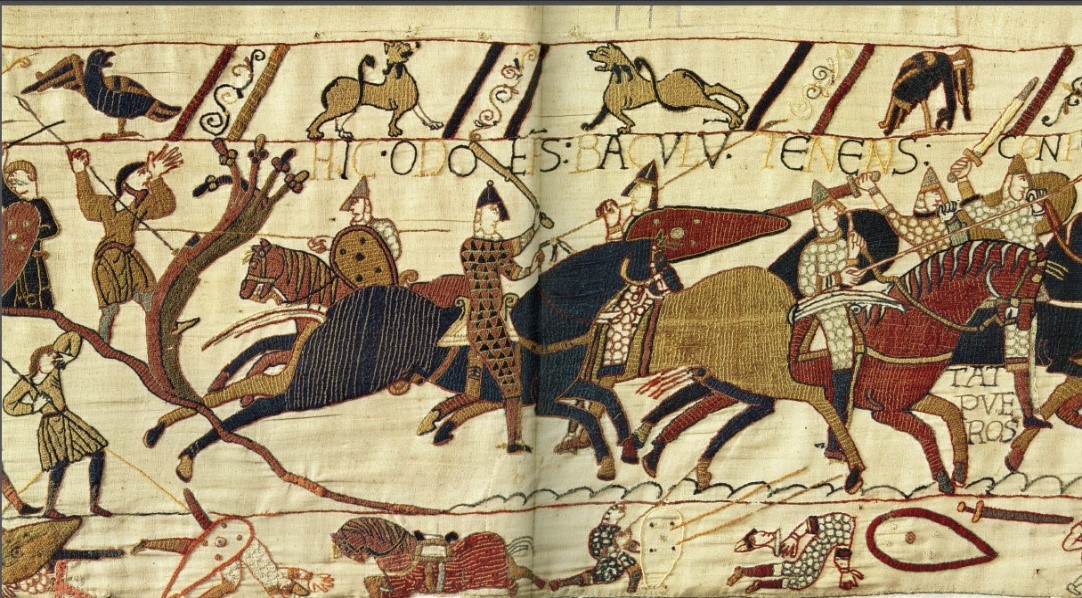
The scene from the tapestry below depicts the Battle of Hastings in all its brutality (Wilson, 1985, Scene 65). The middle and largest band shows the “brutal clash between the onrushing [Norman] cavalry and the stolid, heavily armored group of [English] foot soldiers” (Noxon, 1968, p. 34-35). The bodies of the dead can be seen in the lower margin, including one near a broken sword (Wilson, 1985, Scene 65).

The scene depicts the intense fighting during the Battle of Hastings.

Scene 65 from the Bayeux Tapestry, Wilson. The scene depicts the intense fighting during the Battle of Hastings.

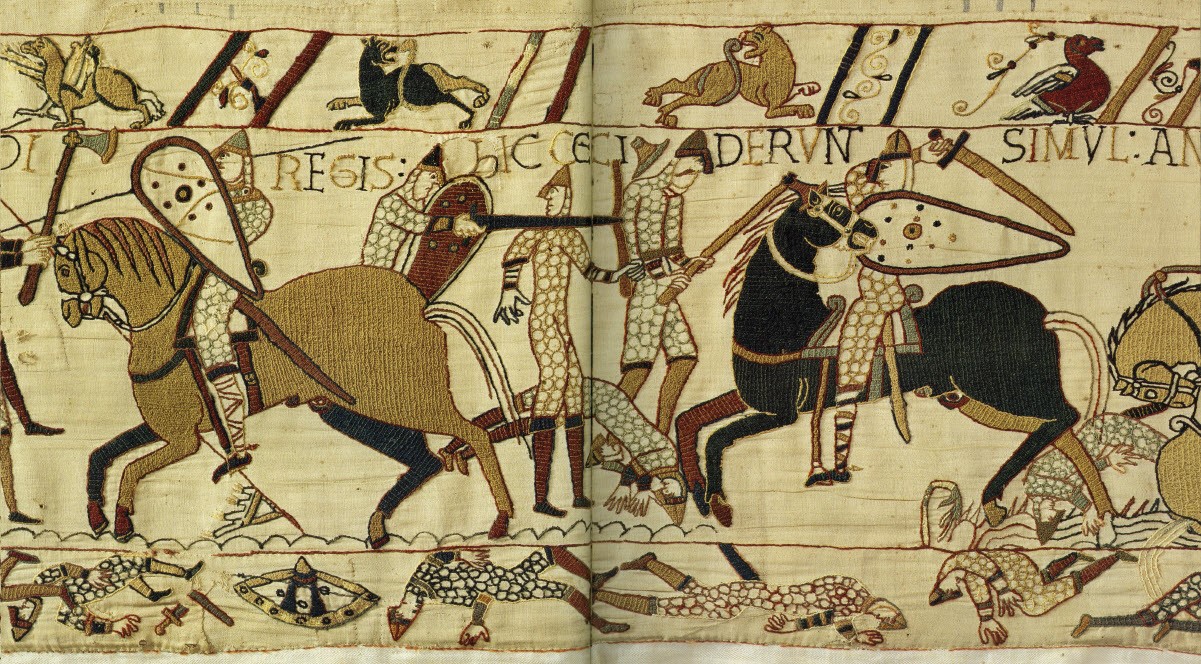
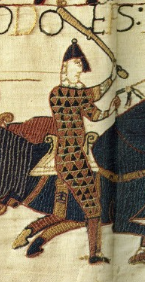
As can be seen by looking at the scene, the Bayeux Tapestry is without a doubt the “best pictorial source of information about the arms and armour of the Normans,” as it illustrates much the equipment and weapons used by their army (“Weaponry,” 2006). The tapestry scene displays many of the characteristics that set the Normans apart in battle. A Norman soldier usually wore a “knee-length mail shirt called a hauberk that…was split from hem to fork to facilitate riding” (“Weaponry,” 2006). The use of chain mail armor allowed for greater movement, which would have been very important for cavalry. Additionally, the Norman horseman would wear a conical steel helmet, with a “wide [nasal] to protect the nose” (“Weaponry,” 2006). The most popular shield was kite-shaped, which provided more protection to the soldiers than the common round shield that was often used. The basic weapon for the Norman cavalry and infantry was the spear, but the cavalry also made use of swords. These were crucial because, “unlike the lance or spear that was easily broken and usually discarded during battle,” swords were much more durable and also highly “valuable [possessions]” for the Normans (“Weaponry,” 2006). Another weapon that may have been even more devastating than the spear and sword was the axe. “If the Bayeux Tapestry is to be believed it could inflict more dire wounds than any other weapon on the battlefield,” and if the Normans fought the battle mostly from horseback, it appears that the English actually made more use of these fierce weapons (“Weaponry,” 2006).

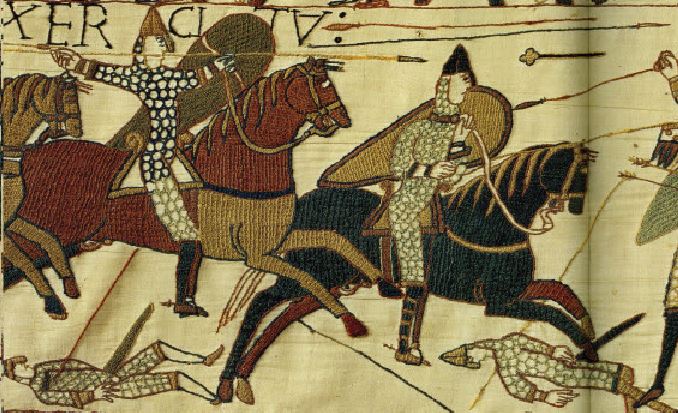
In this panel, the Latin inscription tells us that “[h]ere at the same time English and French fell in battle” (Wilson, 1985, p. 173). It shows the battle getting more intense, with an axe getting “decapitated,” a horse being struck in the head, and a number of soldiers wielding swords and axes “with great abandon” (Wilson, 1985, p. 192). This all would have been taking place after the English “broke ranks to pursue” the Normans, and were lured “into a more vulnerable position,” where the Norman forces could finish them off (Bartlett, 2010).

This panel from the Bayeux Tapestry, with its vivid colors and dramatic fighting, sheds a lot of light on the subject of Norman battle tactics, and will surely continue to be one of history’s greatest pictorial narratives.


Works Cited

Bartlett, R. The Bayeux Tapestry. (August 3, 2010). Retrieved March 26, 2014 from http://www.bbc.co.uk/blogs/ahistoryoftheworld/2010/08/the-bayeux-tapestry.shtml   bbc.co.uk/blogs.

Noxon, G. (1968). The Bayeux Tapestry. Cinema Journal, 7, 29-35. Retrieved from http://www.jstor.org/stable/view/1224876

Weaponry: Norman Arms and Armour. historynet.com. (June 12, 2006). Retrieved March 27, 2014 from http://www.historynet.com/weaponry-norman-arms-and-armour.htm

Wilson, D. M. (1985). The Bayeux Tapestry. New York, NY: Thames & Hudson, Inc.

Leave a comment

Filed under Uncategorized

The Bayeux Tapestry: Panel 73

The Bayeux Tapestry is an elaborate medieval embroidery featuring a visual history of the Battle of Hastings in 1066 A.D. and the events preceding. Throughout the 230 foot tapestry, several important historical figures are depicted in several different scenes and environments, each of different historical importance. Primarily revolving around William, Duke of Normandy (later known as William the Conqueror) and King Harold of England, the tapestry depicts the Norman conquest of England with great detail. Although the textile’s exact origin is unknown, it is predicted to have been commissioned c.a. 1070 A.D. by Bishop Odo, a half-brother to William (W. Contributors, 2014) . The tapestry provides us with lots of information, however one of the greatest mysteries of this historical document is its ending.

As the story of William and Harold progresses, it reaches a climax in the battle of Hastings as a great war between the two parties breaks out. Just prior to the end, an embroidery of the dead King Harold (Panel 71) is seen with the caption “Here King Harold has been killed” (Wilson, 2004). Immediately following this, we see imagery of the English running away from the incoming Normans (Panel 73). Then, without any sense of conclusion the tapestry comes to a rather abrupt close. In accordance with this accelerated ending, many scholars have come to believe that this is not the physical end of the tapestry, suggesting that it is in fact incomplete. This claim seems valid as no border is present following the final scene (Rud, Morgens, 2002). However, there is still plenty of information that we can learn from the 73rd Panel including a somewhat reliable recreation of the aftermath of the gruesome battle of Hastings.

Bayeux

Bayeux Tapestry Panel 73 as taken by Wilson

Panel 73 lives up to the tapestry’s last words, “… and the English have turned to flight” (Wilson, 2004). These sharp words are paired with the grueling imagery of the aftermath of The Battle of Hastings, including dismembered limbs and injured men scattered about the elaborate bordering. On the far right we see several Englishmen running off, some entangled in vines and another with an arrow in his head. On the left we see the confident Norman’s running off the English as if they are cattle. The pains of failure and denial are especially evident in the horrified look of an Englishman looking back over his shoulder. This scene uncovers very directly all the emotions of the aftermath from such a battle. In accordance, this particularly gruesome imagery perfectly represents the nature of this horrendous occasion for the English, contrasted with the triumph and victory of William and the Normans (Ingram, J., 1966). It clearly presents the greatest of confidence along with the despair of failure in one conglomerate frame.

Parts

Depiction of dismembered arm and head from Panel 73 of Bayeux Tapestry as taken by Wilson

The Bayeux Tapestry utilizes great amounts of detail to portray the reality and emotion of the events taking place to the viewer. Although some imagery may not be completely accurate, the tapestry does snapshot many elements of the culture and technology of the time. This is evident as the Normans armor is depicted as a form of a mail or scale design. These were called hauberks and were, in fact, often used to Norman infantry and cavalry (Weaponry, 2006). Use of bows and arrows are also present in the embroidery. The Bayeux Tapestry’s pictorial representations of Norman arms and armor have been cited as some of the best examples of Norman armor, and have been used to confirm the nature of their technology. Details such as these allow us to really receive a more accurate picture of how, where, and when these events took place, which is really what makes this Tapestry so significant.

Normans

Depiction of Norman Cavalry from Panel 73 as taken from Wilson

This amazing textile offers lots of information about the conquest of the Normans, and should be looked at as a history of these crucial events. Although not accurate in all accounts, the amount of effort put into this tapestry speaks for its importance to the people of the time and to us. The detail and craftsmanship of the Bayeux Tapestry truly allows its viewers to peek back into history with all its glory and its horror.


Bibliography


Britain’s Bayeux Tapestry. (n.d.). Retrieved April 1, 2014, from Bayeuxtapestry.org.uk: http://www.bayeuxtapestry.org.uk/

Contributors, W. (2014, March 27). Battle of Hastings. Retrieved April 1, 2014, from Wikipedia.org: http://en.wikipedia.org/wiki/Battle_of_Fulford

Contributors, W. (2014, March 24). Bayeux Tapestry. Retrieved April 1, 2014, from Wikipedia.org: http://en.wikipedia.org/wiki/Bayeux_tapestry

Dowell, C. R. (1966, November). The Bayeux Tapestry and the French Secular Epic. The Burlington Magazine, 108(764), 549-560. Retrieved March 1, 2014, from http://www.jstor.org/stable/875133

Ingram, J. (2008). The Anglo-Saxon Chronicle. Retrieved April 1, 2014, from Avalon.law.yale.edu: http://avalon.law.yale.edu/subject_menus/angsax.asp

Rud, Morgens. The Bayeux Tapestry: And the Battle of Hastings 1066. Trans. Chris Borjensen. Chrisian Eilers, 2002. Book. 1 April 2014.

Weaponry: Norman Arms and Armor. (2006, June 12). Retrieved April 1, 2014, from Historynet.com: http://www.historynet.com/weaponry-norman-arms-and-armour.htm

Wilson, D. M. (2004). The Bayeux Tapestry. New York, New York: Thames and Hudson Inc. Retrieved April 1, 2014


Leave a comment

Filed under Uncategorized

The Bayeux Tapestry, pl 61

The Bayeux Tapestry is a piece of artwork that depicts the battle of Hastings in 1066. The battle took place as part of a succession struggle to claim the throne of England. Amongst the contenders were Harold, king of the Anglo-Saxons, William, the duke of Normandy, a Norwegian king also named Harold, and William’s brother Tostig (Contributers, 2014). Tostig and the Norwegian Harold were both defeated by the Anglo-Saxon Harold, which left only him and William as serious contenders for the throne.

Tapestry Snip
Pl 61, Wilson.

This piece of the tapestry seems to be about the beginning of the battle. One piece of evidence that supports this is that most figures in this section are wielding javelins instead of swords (Magazine, 2006). It was standard practice around this time to begin battle with javelins, as they had better range than swords. When they broke, then it was time to switch over to the swords for up close combat. Another possible piece of evidence comes from the mace, apparently flying through the air, in the upper right corner (Wilson, 1985). This could suggest that it was thrown in panic, the soldier wielding it terrified by the opening cavalry charge. One final piece of evidence can just be glimpsed on the right hand edge of the above image. It is more clearly visible on the full panel, but it appears that the Anglo-Saxon’s shields are full of arrows. This suggests that the opening volley of arrows wasn’t terribly effective (Rud, 2002). Each of these pieces individually might not be clear evidence as to what is happening in the panel, but taken as a whole it makes for a compelling case.

While it is difficult to predict where the battle could have gone from the opening alone, we do in fact know what happened. Harold’s army used a shield wall as a defensive tactic, which was quite effective at first. Eventually though, the wall was broken, allowing the Norman’s to slip through. Harold was killed, and while his army fought bravely afterward, their cause was lost and they eventually fled the battlefield (Ibeji, 2011). William hadn’t won the throne just yet, but by Christmas the crown was his.

Bibliography

Contributers, W. (2014, April 1). Battle of Hastings. Retrieved from Wikipedia: http://en.wikipedia.org/wiki/The_Battle_of_Hastings

Ibeji, M. (2011, February 17). 1066. Retrieved from BBC: http://www.bbc.co.uk/history/british/normans/1066_01.shtml

Magazine, B. H. (2006, June 12). Weaponry: Norman Arms and Armour. Retrieved from Historynet: http://www.historynet.com/weaponry-norman-arms-and-armour.htm

Rud, M. (2002). The Bayeux Tapestry and the Battle of Hastings 1066. Copenhagen: Christian Ejlers Publishers.

Wilson, D. M. (1985). The Bayeux Tapestry. London: Thames & Hudson.


Leave a comment

Filed under Uncategorized

Bayeux Tapestry

Bayeux Tapestry

Bayeux Tapestry

Bayeux Tapestry

Blog Post 3

March 30, 2014

Imagine an embroidered cloth, around 230 ft. long, that depicts many events, all in amazing imagery, and all done on one long piece of cloth. This is what the Bayeux Tapestry accomplished. The Bayeux Tapestry is a supreme accomplishment that depicts scenes from the Norman conquest of England, which included William, Duke of Normandy and Harold, Earl of Wessex (who later became King of England) in the Battle of Hastings.

Although not a true tapestry, where the design is actually woven into the cloth, indeed it is magnificent embroidery. The Bayeux Tapestry’s survival isn’t the only amazing; its length, colors, workmanship and harmony is something that surprises many as they view this spectacular work of art. This tapestry contains over 60 endless fascinating scenes that contain Latin writings embroidered on the cloth. The scenes are embroidered with wool yarn on tabby-woven linen estimated to be about 224.3 ft × 1.6 ft, and is estimated to be longer since historians suggest that some pieces are missing. Two different methods were used to create these scenes, outline or stem stitch for lettering and the outlines of figures and couching or laid work for filling in figures. As each panel was completed, it was put together to create one beautiful, colorful masterpiece.

Panel 69 contains scenes of men on horses fighting other men on the ground with long spears and swords. The main yarn colors used in the scene are terracotta, blue-green, gold, olive green, and blue with light yellow also intertwined with the other colors. In this scene I think that the Normans attack viciously as they fight on their horses with spears and swords, stabbing the men on the grounds that carry shields in the design of a twisted X.  I think that this piece of the art was used to show the nature of the battle as numerous horses ride towards the enemy. I think that is starts to show a victory as you look at the different scenes after this panel as it describes how Harold is struck, and Normans become victorious. While also included in the scene is Latin words, which according to many sites, state that in my panel, it is saying that the men who were with Harold fell and here King Harold was killed.

As fighting scenes are viewed throughout many of the panels, there is also some scenes of nudity as well, although not in my panel, I thought it was interesting that they also included nudity in a piece of art like this as well. I think it shows how nudity was an important aspect to display, to show more meaning to the art. Although my scene showed mostly men fighting on horses, it was interesting looking at the detail put into this panel. As you look above, on both top and bottom of the panel there are borders that have detailed embroiders as well.

Throughout each border are men, who all look slightly different, that carry bow and arrows. There are bags filled with arrows in front of the men, while they all point in the direction of the enemy. All wear similar types of clothing, which I believe shows how they were all on the same side. I thought this bottom border had a lot of detail because each man has a different face shape/expression, some have a beard, while others don’t; showing that a lot of time was put into this stitching.  While the top borders show a lot of mythological creatures such as dragons, lions, and hunter-type images which I think adds meaning as well.

As so much detail was put into this piece, it is remarkable how it could last so long many years later. The detail in this panel is absolutely incredible. The Bayeux Tapestry shows the detail of the horses, the face expressions, the clothing, and armor. It is so well detailed that you can almost imagine in your head the whole day this battle took place. You see the detailed weapons of the Norman horseman; every character throughout the tapestry plays a role. With this well-detailed panel, you can almost tell everything that’s going on just by looking at each man. As one man tries to remove an arrow from his body, you get a sense of who will be victorious.

Bibliography

Aemma. (2000, October 20). A Guide to the Bayeux Tapestry . Retrieved from http://www.aemma.org/onlineResources/bayeux/bayeuxIndex1.html

Bayeux Tapestry. (2013, May 12). Retrieved from Wikipedia : http://en.wikipedia.org/wiki/Bayeux_Tapestry#Construction.2C_design_and_technique

Bloch, H. (2006). A Needle in the Right Hand of God: The Norman Conquest of 1066 and the Making and Meaning of the Bayeux Tapestry. Random House.

Brown, S. A. (1988). The Bayeux Tapestry: History and Bibliography. Boydell: Woodbridge Press.

Ingram, J. (2008, December 12). The Anglo-Saxon Chronicle. Retrieved from Yale Law School: http://avalon.law.yale.edu/subject_menus/angsax.asp

Propaganda on cloth. (n.d.). Retrieved from The Bayeux Tapestry, after 1066: http://www.all-art.org/history194-29tapestry.html

UNESCO. (n.d.). Bayeux Tapestry. Retrieved from Tapestry or embroidery ?: http://www.tapestry-bayeux.com/

Wilson, D. The Bayeux Tapestry.


Leave a comment

Filed under Uncategorized

Blog post three: a section of the Bayeux tapestry

Wilson21

Plate 21 from Wilson

In this section of the Bayeux tapestry, the Norman forces, William the Conqueror, Harold Godwinson and Rivallon of Dol-Combourgh attack the Dol de Bretagne.  Duke Conan II of Brittany escaped the Normans using a rope and climbing out a window.  The main focus of this section of the tapestry depicts Duke Conan escaping through a window and the Normans pursuing Duke Conan past the capital of Brittany, Rennes.

The Bayeux tapestry is one of the first appearances of a coat of arms. On several of the shields of the soldiers is featured a cross.  The Bayeux tapestry was created in the 11th century. Coats of arms didn’t come into vogue until the 12th century. Characters typical of coats of arms appear in both the top and the bottom boarders of this section of the Bayeux tapestry. A coat of arms has much symbolism, everything from the colors used to the animals represented. The presence of elements of different coats of arms can symbolize the dominance or inferiority of one side or the other.

In the border of this section of the Bayeux tapestry is the depiction of a the characters in the coat of arms of each side of the battle.  On the top is the depiction of the the lion from the duchy of Norman’s coat of arms and the fleur-de-lis (lily flower in French) from the duchy of Brittany’s coat of arms.  On the bottom border is the duchy of Brittany’s fleur-de-lis and the griffin from the coat of arms of the kingdom of England.

Color is an important element in art, especially a piece of art like the Bayeux tapestry that depicts historically important events.  The fleur-de-lis, griffins and lions all appear in black, red and yellow. Through the ages, colors have often taken on different meanings, however certain themes about color have remained constant. Black often represents power, red stands for strength and yellow for energy.

That there is far color in the fleur-de-lis would insinuate that the artist that created the Bayeux tapestry thought that while Conan had power, strength and energy, he did not have as much as William the Conquer, Harold and Rivallion.

It should be noted that the figures represented in the borders of the Bayeux tapestry are not equal in size. The fleur-de-lis are much smaller than the griffins and the lions. This difference in size would insinuate that the artist saw an incongruence of power between Brittany and the Normans and England.


Works Cited:

Wilson, David M. The Bayeux Tapestry. New York: Thames & Hudson Inc., 2004. Print.

“Brothers in Arms- scene 2”. Britain’s Bayeux Tapestry at the Museum of Reading. 31 March 2014. Web. http://www.bayeuxtapestry.org.uk/bayeux9.htm

“Breton-Norman War” Wikipedia. 31 March 2014. Web. http://en.wikipedia.org/wiki/Breton-Norman_War

“Heraldry Symbols and their Meanings”. familytreeandcrest.com. 31 March 2014. Web. http://www.familytreesandcrests.com/heraldry-symbols.htm

Leave a comment

Filed under Uncategorized

Bishop Odo and the Battle of Hastings

Plate 67 from Wilson

Plate 67 from Wilson, Bishop Odo Encouraging his troops at the Battle of Hastings

The section I received was part of the Battle of Hastings. Before I go into what my panel is about, here’s a little background on the Battle of Hastings and why it was taking place. William, the Duke of Normandy, was fighting King Harold of England (Hicks 3). This fight between them was called the Battle of Hastings. My panel takes place right after the Norman troops thought that William was slayed. The man on the horse with the club in the air was William’s younger half-brother, Odo, who was a Bishop. He has his club in the air and was trying to encourage the Norman troops to press forward; they didn’t want to go on because they thought William was dead. The Latin above this scene reads “Hic Odo Eps (Episcopus) Baculu(m) Tenens Confortat Pueros”, –  which translates to “Here Odo the Bishop holding a club strengthens the boys,” (Wikipedia Contributors).

Detailed Plate 67 from Wilson

Detailed Plate 67 from Wilson, Bishop Odo and his baculum

It is important for history’s sake to know that Odo was a Bishop, and that he was holding a club. As a man of the church, he was not meant to have a blood-shedding weapon, such as a sword. However, he gets around this by brandishing a “baton of command” called a baculum (Wilson 194). It is noticed that all of the other warriors and soldiers are holding swords and long spears, but since he was a man of God and held a church calling, he was holding a club. It is also noticed that he is not wearing any sort of body armor in this scene, just a helmet. This gives more evidence to show that since he was a Bishop, he was not supposed to be engaged in any sort of fighting activity. The border below the middle scene is filled with dead and dismembered corpses, broken weapons, and even a dead horse. Showing the fallen soldiers of the war (Wilson 193).

This panel gives a lot of historical evidence. It shows what the soldiers may have looked like when in battle, and also gives a good representation of what the Bishop and other religious leaders would have looked like (no armor, just a helmet), and why.

References:

Hicks, Carola. The Bayeux Tapestry: The Life Story of a Masterpiece. London: Random House, 2006. Print.

Wikipedia contributors. “Odo, Earl of Kent.” Wikipedia, The Free Encyclopedia. Wikipedia, The Free Encyclopedia, 19 Mar. 2014. Web. 27 Mar. 2014.

Wilson, David M. The Bayeux Tapestry. New York: Thames & Hudson Inc., 2004. Print.


Leave a comment

Filed under Uncategorized

Nearchus’ Journey Down the Indus: Eastern or Western Arm?

 It is speculated that Nearchus, although senior to Alexander the Great, was educated alongside him. After being exiled by Alexander’s father, Nearchus was invited back to the court shortly after Alexander took the throne in 336.  He joined Alexander in the invasion of Asia in 334, fought with him in multiple battles, and was put in charge of several conquered areas, including Telmessus, where he crushed a revolt.  Alexander called him to join him in his conquest of India in 329. Despite successes, Alexander’s army eventually refused to travel further east. Alexander decided to return to Babylon and put Nearchus in charge of the construction of a large fleet, meant to voyage down the Indus River to meet the rest of the army at the ocean. It is generally believed that the voyage down the Indus lasted from Novemeber 326 to July 325. (Livius) Due to the monsoons and resisting native towns, the fleet had a series of delays traveling down the river. Eventually, Alexander and his men met up with what was left of the fleet and victoriously departed (Arrian).

However, the route Nearchus took on the river remains debated. Popular understanding dictates that Alexander took the eastern water route on the Indus back, but in his article entitled, “Some Passages in Arrian Concerning Alexander” N.G.L Hammond argues that the work has been mistranslated and thus has resulted in an inaccurate understanding of Nearchus’s route back to meet Alexander. He says, “If we translate the Greek correctly, there is no ambiguity. ‘The Indus outlet on this side’ is the western outlet, the nearest to the writer’s viewpoint” (Hammond).

Additionally, Hammond argues that his interpretation makes more sense with Alexander’s actions, “First, he went down the ‘right-hand’ river, i.e. to the western outlet…Next he returned to Pattala. From there he sailed down the other arm of the Indus to the other mouth, the eastern one. His aim was to learn which mouth gave easier access to the sea…As he went down the eastern arm, Alexander came to a great lake, something which did not exist on the western arm; he left his main force at the lake and went on himself to the outlet. He then rowed out to see. Thus he learnt that the mouth of the Indus on this side was the easier, i.e. the western outlet. The expedition of Nearchus, then, was to sail from the Western arm of the Indus” (Hammond). Thus, Hammond argues that Alexander only explored the Eastern route to check if it was an easier route. When Alexnader encountered rough waters, he surely must have sent word to Nearchus to take the western route, and thus, Nearchus sailed on the western route.

"Nearchus Map" . (Year image was created). Title of work [Marp], Retrieved March 10, 2014 from: http://www.livius.org/a/1/maps/nearchus_map.gif

“Nearchus Map” . [Map], Retrieved March 10, 2014 from: http://www.livius.org/a/1/maps/nearchus_map.gif

(The map above shows Alexander’s possible routes the Perisan sea).

However, scholar J.R. Hamilton in his article entitled, “The Start of Nearchus’ Voyage” explains his firm academic belief that there is no mistranslation, and Arrian meant to describe Alexander taking the eastern route, “it is clear from what follows in Arrian that he (Arrian) intends the reader to understand that it was the eastern arm that Alexander found easier to navigate.” Hamilton additionally argued that Alexander’s actions indicated he took the eastern route, “he relates that the king (Alexander) landed and with some of his Calvary explored the coastline to see what kind of country it was for the coasting voyage, and ordered wells to be dug to provide water for the fleet…If Alexander had in mind to sail down the western arm, what was the point of all this activity? Moreover, it seems clear from Arrian’s description of Alexander’s voyages down the two arms that the king found the eastern easier to navigate.”

Thus, the exact route of Nearchus while he traveled down the Indus River to meet with Alexander is still up for debate. Until any artifacts are found that can shed more light on the matter, it will probably maintain uncertain.


Bibliography

Goold, A. G. (1983). Arrian Indica. Cambridge: Harvard College.

Hamilton, J. R. (1994). The Start of Nearchus’ Voyage. Historia: Zeitschrift für Alte Geschichte, 501-504.

Hammond, N. G. (1980). Some Passages in Arrian concerning Alexander. The Classical Quarterly, 455-476.

Lendering, J. (2009, January 1). Nearchus. Retrieved from Livius.org: http://www.livius.org/ne-nn/nearchus/nearchus.html


Leave a comment

Filed under Uncategorized

Battle of Issus

The battle of Issus was a decisive victory for Alexander the great in many ways. It was the first time a Persian army with the King present was defeated. Much of the success of this battle can be atrributed to the terrain of the area. It limited the size of the Persian army and gave Alexander the advantage. ”[Alexander] said the god was pursuing a better strategy on their behalf, having given Darius the idea of moving his army from an open space into a narrow one, where the terrain would be wide enough for the deployment of their own phalanx, but where the Persians would derive no advantage from superior numbers” (Arrian).


Darius III was the king of Persia. His army was significantly larger than Alexander’s with an army that most scholar’s agree was around 108,000 troops (Warry) while Alexander had a much smaller army of around 30,000 to 40,000 troops (Delbruck). The terrain had it’s own benefits for both armies and it really came down to who could use the terrain the best. “The mountainous terrain presents a string of narrow passes; it was a natural place for the Persians to try to bottle up Alexander” (Sacks). Darius had a better advantage because he was in a defense position. He had passed by Alexander’s small army unnoticed and cut off Alexander’s lines of communication with the main part of his army under the direction of Parmenio, one of Alexander’s generals (Moerbeek). He was able to do this because the armies were separated by a small group of mountains. As soon as Alexander learned that Darius had cut off his communications, he began making preparations to attack and take back the city of Issus.  


Image

From The Landmark Arrian: The Campaigns of Alexander


 Darius has his army spread out by the mouth of the Issos river and Alexander has to march out of the mountains in order to face Darius. He recognized that the mountains would give Persian archers a great advantage over his army. He made the decsion to keep his army moving at a steady pace until they were within range of the archers. They did this to help keep the phalanx together and at peak effectiveness, as running made it more difficult to keep the phalanx together and effective. As soon as they were within range of the archers they began to run to decrease the damage taken by the hailstorm of arrows, which had the byproduct of intimidating the Persian army. It also made it more difficult to keep the Macedonian phalanx together.      


Image

From The Landmark Arrian: the Campaigns of Alexander

As the two armies engaged, the Persians broke through the Alexander’s phalanx. “Darius’ Greek mercenaries attacked the Macedonian phalanx when a gap appeared in the right wing; for when Alexander dashed zealously into the river coming to blows with the Persians posted there and driving them off, the Macedonians at the center did not apply themselves with equal zeal, and when they came to the banks, which were steep at many points, they could not keep their front line in proper order” (Arrian). At nearly the same time as the Greek mercenaries fighting with the Persians broke through the Macedonian phalanx, Alexander’s cavalry broke through the Persian lines near Darius and attacked the mercenaries from behind. Darius ended up fleeing the battle for fear of his life with the his army following him once they saw him leaving. Alexander won many decisive small victories that led to this successful battle at Issus.


Works Cited

Arrian, Pamela Mensch, and James S. Romm. “Issus.” The Landmark Arrian: The Campaigns of Alexander ; Anabasis Alexandrous: A New Translation. New York: Pantheon, 2010. 67-73. Print.

“Battle of Issus.” Wikipedia. Wikimedia Foundation, 03 July 2014. Web. 07 Mar. 2014.

Delbrück, Hans. Warfare in Antiquity. Lincoln: University of Nebraska, 1990. Print.

Hammond, Nicholas G. L. “Alexander’s Charge at the Battle of Issus in 333 B.C.” Historia: Zeitschrift Für Alte Geschichte 41.4 (1992): 395-406. Jstor. Franz Steiner Verlag. Web. 7 Mar. 2014.

Moerbeek, Martijn. “The Battle of Issus.” Warfare in Hellas. N.p., 21 Jan. 1998. Web. 7 Mar. 2014. <http://monolith.dnsalias.org/~marsares/warfare/battle/issus.html&gt;.

“Pothos.org.” Major Battles. N.p., n.d. Web. 07 Mar. 2014. <http://www.pothos.org/content/index.php?page=major-battles#issus&gt;.

Sacks, David, Oswyn Murray, and Lisa R. Brody. “Alexander the Great.” Encyclopedia of the Ancient Greek World. New York: Facts on File, 1995. 23. Print.

Warry, John. Warfare in the Classical World: War and the Ancient Civilizations of Greece and Rome. London: Salamander, 1998. Print.

Leave a comment

Filed under Uncategorized

Alexanders Scouting Techniques

Alexander the Great is known for being one of the greatest army commanders of all time. There are many stories of the battles he won and how he won them.  Alexander was often on the move. He had thousands of men that he constantly needed to move at one time.  The terrain was often tough and dangerous, and he couldn’t afford to lose any men on the way to battle since he needed them to fight.These conditions often required a special kind of member of the army that is often overlooked in great armies. These members were scouts. Scouts were used for many reasons, all of which gave Alexander’s armies a great advantage over the enemy.  One of the main jobs of a scout was to go ahead and survey the terrain.  Quintus Curtius wrote,  “ Then, as the scouts that had been sent ahead reported that all was safe, he sent on a few of the cavalry, to try to ford the river.” Terrain really does play a much bigger role in battles than we give it credit for.  The river Curtius talks about easily could have swept away and killed  Alexander’s troops as fast the incoming Persian army.   Even now, there doesn’t seem to be that much written on the subject of Alexander’s scouts.  Scouts aren’t as interesting of a subject as something like Berserkers or a general of an army, but they were just as important.

If scouts weren’t utilized by Alexander, then the outcome of many battles would have been very different, such as the battle of Issus.  Quintus Curtius wrote a lot about Alexander and Darius. He wrote, “They could hardly be believed ; therefore Alexander ordered scouts, sent ahead by sea to those regions, to find out whether Darius was coming in person, or whether some one of his generals had made believe that the whole army was on its way.” This is a good example of another way  the scouts were utilized.  In this case the scouts had one job: to go as fast as they can to see what was heading towards them.  If the whole army was on its way, then Alexander would have to ready his army, but if Darius himself was coming, a more of a political discussion would take place.  When scouts are thought of, this is often the job we think of them having.  Getting military intel is something that is more valuable than any amount of men. Alexander knew this and that is why he used scouts so much.

These are the two main scouting techniques that we have evidence of Alexander using: terrain scouting, and military scouting.  Both of these scouting techniques probably saved the lives of countless soldiers in Alexander’s army.  In my opinion, scouts are a big part of why Alexander was so successful. He knew how valuable they were, and he understood that the information they could obtain was very valuable. Scouting is still and will always be a huge part of military action.  Alexander’s army contributed to the scouting ideas that we still use today.

Work Cited

“Alexander The Great.” LibertyReferences.com.  http://www.libertyreferences.com/alexander-the-great.shtml

Bose,  Partha. Alexander the great the art of strategy.  Penguin Books India. May 1, 2004. http://books.google.com/books?id=KZI18k24niIC&pg=PA50&dq=alexander+the+great+intelligence+gathering&hl=en&sa=X&ei=0n4PU-XYC8z6oAT_7YD4BA&ved=0CDYQ6AEwAA#v=onepage&q=alexander%20the%20great%20intelligence%20gathering&f=false

Curtius, Quintus.  History of Alexander with an English translation.  Ed. John C. Rolfe. Cambridge: Harvard Univ. Press, 1946. http://babel.hathitrust.org/cgi/pt?id=mdp.39015008158415;view=1up;seq=157

http://en.wikipedia.org/wiki/Ancient_Macedonian_army Image

Lendering, Jona. ” Alexander the Great, The Good Sources.” Livius.  Web    http://www.livius.org/aj- al/alexander/alexander_z1b.html

Leave a comment

Filed under Uncategorized

The Battle of Halicarnassus


Ruins of the fortifications around the city; 4th c. BC; Bordrum, Turkey

The siege of Halicarnassus (located in modern Bodrum, Turkey) was fought between the Macedonians and the Persians. Alexander the Great was the leader of the Macedonians and Memnon of Rhodes was the leader of the Persian garrison. This event occurred in 334 BC. The wars of Alexander the Great started when his father, Philip II, was assassinated by the captain of his bodyguard. Because Alexander was the next in line to be an heir to the kingdom, he was proclaimed king. Many states were outraged about the news of Philip II’s death and began to revolt. Alexander gathered over 3,000 cavalry men and took control over them. He then set off to conquer Persia.

One of Alexander’s tactics was to siege all the cities on the way to Halicarnassus with the help of his 3,000 cavalrymen. “But Alexander, on entering Caria, in a short time got possession of all the cities between Miletus and Halicarnassus” (Quintus Curtius, 52). He was able to do this due to his existing relations with the Greeks in the cities. “Most of them were inhabited by Greeks, to whom he was accustomed to restore immunity and their own laws, declaring that he had come into Asia to free them” (Quintus Curtius, 53). After conquering Caria, Alexander left his cavalrymen behind and used alternate means of attacking Halicarnassus. “These troops were left in Caria as part of the provincial army” (Sekunda 22). Even though the Macedonian cavalry wasn’t used in the siege of Halicarnassus, they were a vital piece of capturing and keeping control of the cities nearby.  

Another reason Alexander didn’t take his cavalrymen to siege Halicarnassus was possibly due to the terrain. Halicarnassus’ citadel was located on an island, away from the acropolis and the rest of the city, which was not ideal for horsemen. In order to capture Halicarnassus, Alexander sent spies into the city to meet with dissidents. “When his spies arrived, however, the dissidents were nowhere to be found” (Wikipedia Contributors). A minute battle broke out, and Alexander’s army was able to get through the city walls. The Persians attacked by using their catapults, which held his army off. In the end, the Macedonians were able to capture the acropolis and the lower part of the city due to a path through the valley close by. Even with this small victory, Alexander was unable to capture the citadel; the Persians were able to keep the Macedonians at bay for over a year. Alexander, knowing that he had lost both time and men, moved on to fight his next battle. Many historians agree that “The most important reason for Alexander’s lack of success was the fact that the Macedonians did not have a navy” (Lendering).


Bibliography

Curtius, Quintus. Quintus Curtius: History of Alexander. 1. 1. Cambridge: Harvard University Press, 1999. 52-53. Print.

Jansoone, Georges. Ruins of the fortifications around the city; 4th c. BC; Bordrum, Turkey. 2007. Photograph. Wikipedia, The Free Encyclopedia. Web. 6 Mar 2014. <http://upload.wikimedia.org/wikipedia/commons/3/36/Turkey.Bodrum003.jpg&gt;.

Lendering, Jona. “The Siege of Halicarnassus.” Livius.Org. N.p., 26 Jun 2008. Web. 6 Mar 2014. <http://www.livius.org/ha-hd/halicarnassus/halicarnassus_siege.html>.

Sekunda, Nick. The Army of Alexander the Great. 1st ed. Oxford: Osprey Publishing, 2004. 22. Web. <http://books.google.com/books?id=rR88jF6taekC&pg=PA22&lpg=PA22&dq=siege at halicarnassus cavalry&source=bl&ots=gyoSnlNlw1&sig=X9i_z7KsRlp_LONoBSDyT28PjWQ&hl=en&sa=X&ei=rIMPU_rFMY2xoQS28oHwBA&ved=0CD8Q6AEwBA

Wikipedia Contributors. “Siege of Halicarnassus.”Wikipedia, The Free Encyclopedia. N.p., 15 Feb 2014. Web. 6 Mar 2014. <http://en.wikipedia.org/wiki/Siege_of_Halicarnassus&gt;.


Leave a comment

Filed under Uncategorized