
In 410 C.E., led by King Alaric, the Visigoths successfully sacked the city of Rome. This catastrophic event was the culmination of a few years’ attempts, and left the symbolic heart of the Roman Empire in a state of chaos.
Under the emperor Theodosius I, Alaric was actually a strong ally of Rome, as Theodosius realized the benefit of having a great barbarian hoard under his control. Alaric also saw how he could gain power through the arrangement, but when Theodosius died, and his conniving adviser Stilicho, a part-Vandal himself, became “ruler of the West” for the young Emperor Honorius, things began to fall apart for the Visigoth king (Bunson, 2002, p. 12).
At first Stilicho tried to use Alaric and the Goths to his advantage politically and as a pool for recruits. Soon after though, Alaric saw that his people were doing all the dirty work, and became angry at the situation. Stilicho saw the shift of the Goth’s mood, so he attacked Alaric and drove the Goths to the East in 402 C.E. (Bunson, 2002, p. 12). Alaric’s “aggressive intentions” toward Rome at this time can be strongly attributed to the fact that he wasn’t compensated for offering military support when called upon to defend the borders of the empire (Constable, 2003, p. 166). With Stilicho vying for power and the tension growing between the Eastern and Western Empires, Alaric saw that his “position in the East was no longer secure,” which may have also contributed to his invasion of Italy and subsequent sacking of Rome (Bayless, 1976, p. 67).
In retaliation for being crossed, Alaric had actually tried to take Rome in 408 C.E., but was given a large sum to leave in peace. He returned the following year, but was repulsed and “kept outside the Aurelian Wall” (Constable, 2003, p. 167). As part of the deals made to appease Alaric’s lust for power, he was appointed the “magister militum per Illyricum” (Master of the Soldiers in Illyria) (Bayless, 1976, p. 66). However, none of these deals and payments were able to dissuade Alaric, as he set out once again in 410 to try show his dominance in the region and bring Rome to its knees.
Alaric had put all his time and effort “in the siege, and had not been able either by force or by any other device to capture the place,” so he devised a great plan (Procopius, 1916 Trans., p. 13). Alaric chose 300 “youths in the army whose beards had not yet grown,” but “possessed…valor beyond their years,” and offered them as slaves to the Roman nobles (Procopius, 1916 Trans., p. 13). These young men were to “display much gentleness and moderation and serve…eagerly” until a set date when they would slip away and kill the guards at the Salarian gate (Procopius, 1916 Trans., p. 15). Meanwhile Alaric would pull some of his men back and make it appear that the siege was lifted. The foolish Romans fell for the Trojan Horse-like trick and suffered dearly for it.
On the appointed day, the young men rushed the guards at the gate and opened it for Alaric’s waiting army. The Visigoths entered Rome, burned down some buildings, then continued to “[plunder] the whole city and [destroy] the most of the Romans” (Procopius, 1916 Trans., p. 17). Alaric’s looting and burning of the city lasted three days, but it was a “relatively restrained affair” compared to the sacking of the Vandals a few decades later (Constable, 2003, p. 167). In the image below, the Goths are shown wreaking havoc on the city, as well as pulling down a Roman monument (Sylvestre (Wikipedia), 1890). It must have been horrifying to awake to the sounds of Goths slaughtering your people and demolishing everything you treasure.
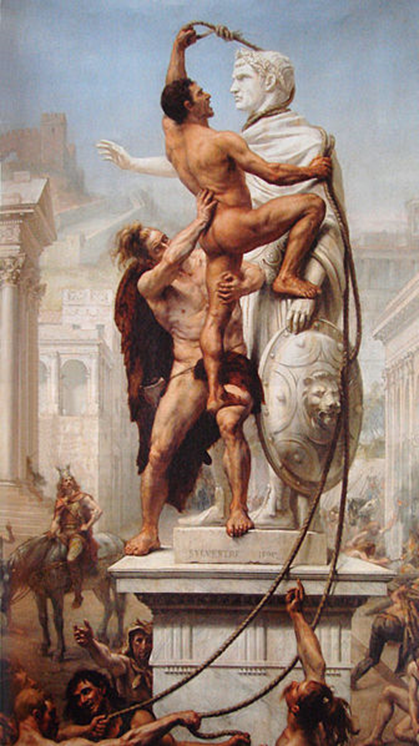
Painting of Visigoths pulling down a monument after entering Rome. Retrieved from http://en.wikipedia.org/wiki/File:Sack_of_Rome_by_the_Visigoths_on_24_August_410_by_JN_Sylvestre_1890.jpg
Alaric’s sack of Rome was a crippling loss for the Roman Empire. While power had already shifted to other cities like Ravenna and Constantinople, the invasion into the symbol of greatness was the pinnacle event in the fall of the Western Empire. In my opinion, this was also one of their most humiliating defeats, all thanks to the arrogance and stupidity of the Roman elite.
Works Cited
Bayless, W. (1976). The Visigothic Invasion of Italy in 401. The Classical Journal, 72, 65-67. Retrieved from http://www.jstor.org/stable/3296883
Bunson, M. (2002). Alaric. In Encyclopedia of the Roman Empire (p. 12). New York, NY: Facts on File, Inc.
Constable, N. (2003). Historical Atlas of Ancient Rome. New York, NY: Checkmark Books.
Procopius. (1916). History of the Wars: Books III-IV (H. B. Dewing, Trans.). Cambridge, MA: Harvard University Press.
Sylvestre, JN. (Artist). (1890). Sack of Rome by the Visigoths on 24 August 410 by JN Sylvestre 1890 [Web Photo]. Retrieved from http://en.wikipedia.org/wiki/File:Sack_of_Rome_by_the_Visigoths_on_24_August_410_by_JN_Sylvestre_1890.jpg


.jpg)